
Kindly Forms overview
Make a form in Kindly Edit > Forms, build it, publish it and put it on a page.
Watch the video
Chapters and transcript Captions are included.
Kindly Forms is the full forms system in Kindly Edit: a form builder, stored entries, emails, connections to other services, payments, documents and reports, all in Kindly Edit > Forms. Every feature is available on every site; nothing is held back for a higher plan.
Kindly Forms is new in Kindly Edit 0.10.0. The simple Form element that lives inside a page, described in Forms, fields, and actions, still works. To bring one of those forms into Kindly Forms, see Move an old page form to Kindly Forms.
What a form is#
- A form is its own record, separate from any page. One form can be shown on several pages, in a popup, or on a page of its own, and its answers are kept together as entries.
- Each form has a published version, which visitors get, and a draft, which the builder saves as you work. Visitors never see the draft until it is published.
- A form is either Open (taking answers) or Closed (not taking answers). Closing a form keeps everything about it; open it again from the forms list.
- Fields, settings, emails and connections live in the form. Email recipients, connection settings and other private settings never reach the page.
Who can use it#
- People who can edit other people's pages (editors and administrators) can make and edit forms, read entries and see reports.
- Site settings (Settings, Connections) and Payments need an administrator.
- An administrator can give named people some of these parts in Settings > Managers. Managers can never change site settings. See Site settings.
The Forms item in the Kindly Edit menu shows a count of unread entries.
The forms list#
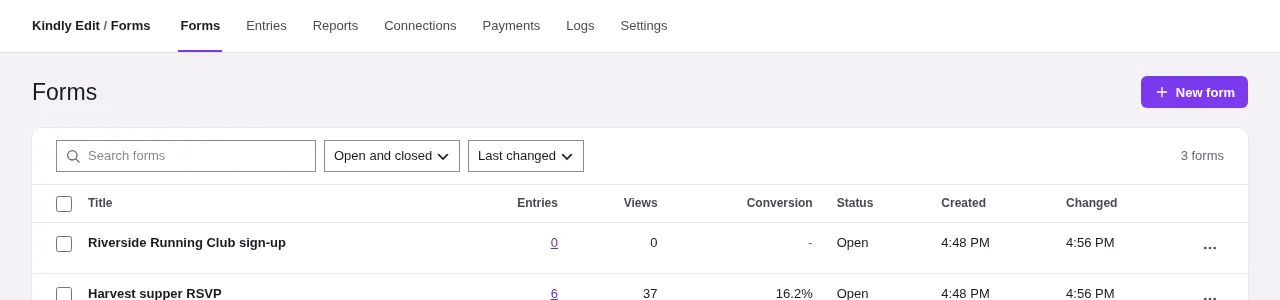
Kindly Edit > Forms opens the forms hub. Its top bar has Forms, Entries, Reports, Inventory (shared stock), Connections, Payments, Logs and Settings; each person sees the parts they may use.
The Forms screen lists every form with its Title, Entries (and how many are new), Views, Conversion (sends per view, counting visitors only), whether it is Open or Closed, when it was made and when it last changed. Under a title, Unpublished changes means the draft differs from what visitors get, and On lists the pages that show the form.
- Search forms, filter by Status (Open and closed, Open, Closed, Trash) and Sort by Last changed, Newest, Title, Most entries, Most unread or Most views.
- Each row's menu has Edit, Entries, Report, Preview, Duplicate, Export, Close to new answers (or Open to answers) and Move to trash. Moving to trash shows an Undo button.
- Tick several rows to Export, Close, Open or Move to trash together.
- In Trash, Restore brings a form back and Delete forever removes the form and all its entries. It can't be undone.
Make a form#
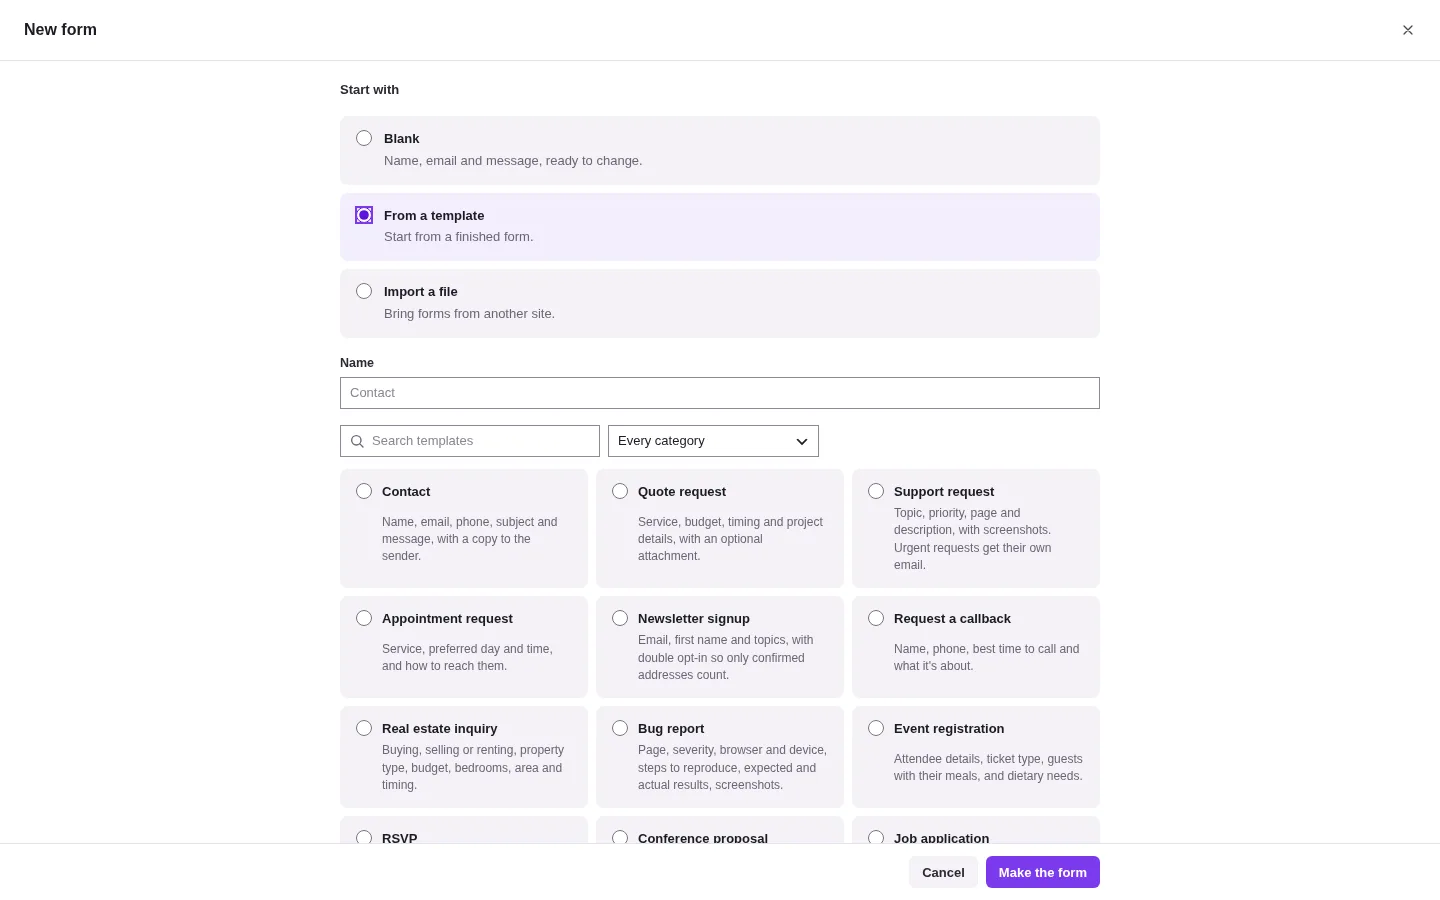
- In Kindly Edit > Forms, choose New form.
- Under Start with, pick one:
- Blank: a name, an email and a message field, ready to change.
- From a template: a finished form. Search the templates or pick a Category.
- Import a file: a
.jsonfile exported from Kindly Forms on any site. Fluent Forms and Gravity Forms exports work too. - From Gravity Forms (0.12.0 and later, only on a site where Gravity Forms has forms): its forms with their add-on feeds and, if you like, their entries. See Import from Gravity Forms.
- Give it a Name and choose Make the form. The builder opens.
A blank form starts with Name, a required Email, a required Message, one email to the site's email address ("Email to the office") and the thank-you message "Thank you. Your answers were sent." Templates and imports are covered in Import forms and templates.
The builder#
The builder fills the screen. Its top bar has:
- the back arrow (All forms) and the form's name, which you can type over;
- the tabs Build, Settings, Emails, Connections, Documents and History;
- on Build, the screen sizes Desktop, Tablet and Phone;
- Undo, Redo, the save status, Preview, Save draft, Publish, and More: Preview in a new tab, Drop unpublished changes, Copy the form as JSON and Keyboard shortcuts.
On narrower screens the WordPress menu folds to icons while you build and comes back when you leave.
Build#
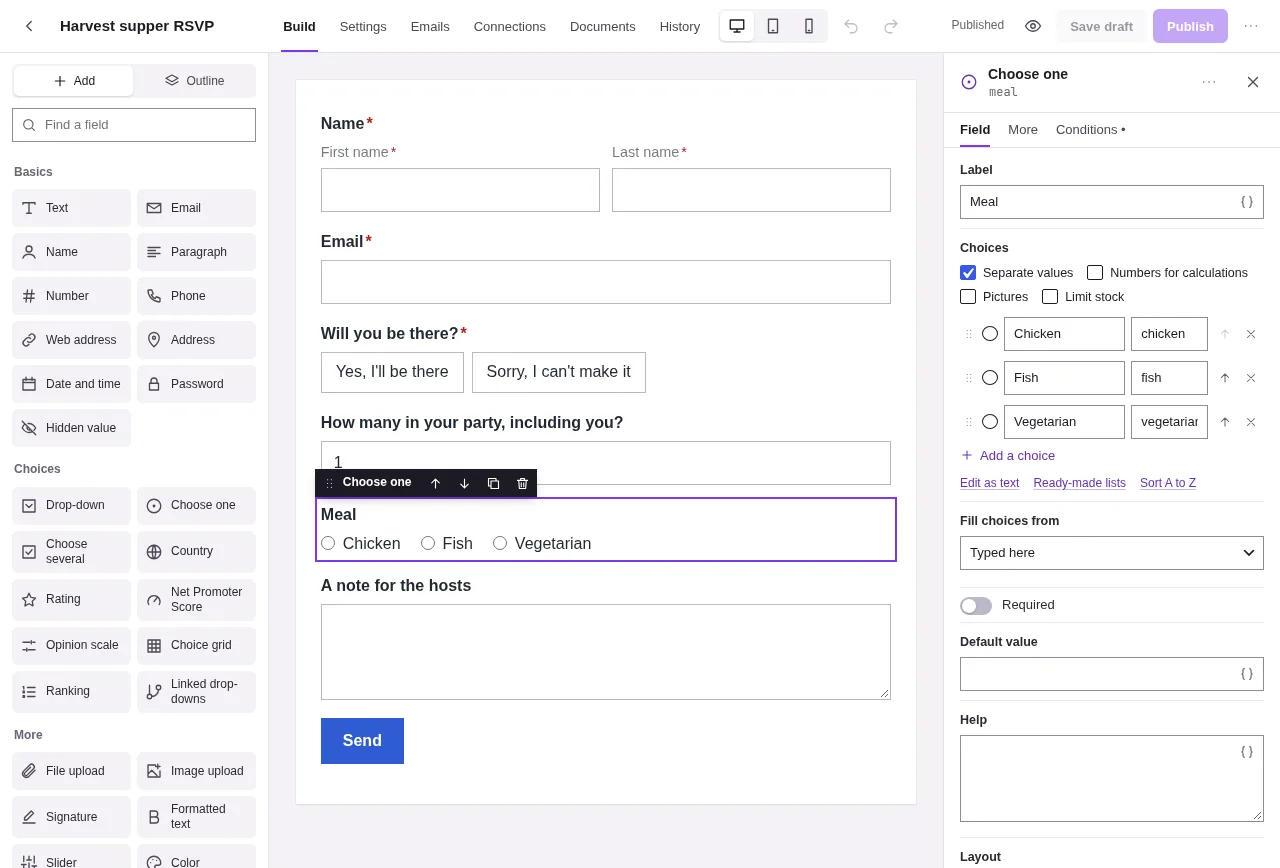
Build has three parts side by side:
- Fields on the left, with two views. Add shows the field tiles in groups (Basics, Choices, More, Layout and words, Payments) and a Find a field search. Outline lists every field in order, nested inside steps, columns, sections and groups, with if on fields that a condition shows and * on required ones.
- The form in the middle. It is the server's own drawing of the draft, with the site's styles, so it looks as it will for visitors. The screen size buttons show it at tablet and phone widths.
- The settings panel on the right, for the chosen field or, with nothing chosen, for the whole form.
Adding a field
- Click a tile. The field goes after the chosen field, or at the end of the form.
- Or drag a tile onto the form or into the outline, to the exact place. Drag and drop works with a mouse, a finger or a pen.
- Or type in Find a field (press / to jump there). Enter adds the first match; the arrow keys move through the tiles.
Shortcode and Server hook can be added only by people who may add code to the site. Their tiles say Only people who may add code can add this for everyone else. Captcha, Send button and Save and finish later can each be added once.
Moving and arranging
- Drag a field on the form by its label bar (Drag to move), or drag it in the outline.
- Drop a field near the left or right edge of another field to put the two side by side. This makes a Columns field, or adds a column to the row it is already in, up to six columns.
- Drop fields into columns, collapsible sections, repeating groups and steps. Empty places say Drop fields here.
- The chosen field's bar has Move up, Move down, Duplicate and Remove. Alt with the up or down arrow moves it too.
- Double-click a label, a heading, a step title or a choice on the form to type over it. Enter keeps the new words; Escape puts the old ones back.
Some places don't take some fields: a page break only goes at the top level of the form, columns don't go inside columns, and a repeating group only takes simple fields. See Fields and layout.
The settings panel
With a field chosen, the panel shows its type and its key, and up to three tabs:
- Field: the main settings, such as Label, Placeholder, Required and the choices.
- More: less common settings, such as Name in entries, Field key, classes, limits and patterns.
- Conditions: when the field shows. See Conditions and calculations.
Its Field actions menu has Duplicate, Copy, Paste after, Change to (a similar type, keeping what both understand), Take out of the columns, Undo the columns, keep the fields (on a Columns field) and Remove.
Settings that understand smartcodes have a button beside them, Insert an answer or other value, which lists this form's answers first, then the entry, the person, the page and the site. See Smartcodes.
With nothing chosen, the panel is the whole form (Pick a field to change it):
| Section | Settings |
|---|---|
| Layout | Labels (Site default, Above, Beside, Hidden), Help text (Below, Above, In a tip), Problems shown (Under each field, In a list at the top, Both), Required mark (After, Before, None), Widest (for example 640px) |
| Send button | Words, While sending, Position (Start, Center, End), Full width, Size (Normal, Small, Large) |
| Look | Style (The site's own, Filled boxes, Underlined, Card, Compact, Large), Accent, Text, Box lines, Box fill, Button, Button text, Space between fields, Corner rounding (Filled boxes and Card), CSS for this form |
Clicking the send button on the form opens just its settings. For an icon, colors or conditions on the button, add the Send button field from the library instead.
Copy and paste. Copy a field (Ctrl+C, or Cmd+C on a Mac) and paste it after another (Ctrl+V). This works between forms too, so a set of fields can move from one form to another.
Keyboard shortcuts (Ctrl is Cmd on a Mac):
| Keys | Does |
|---|---|
| Ctrl+Z, Ctrl+Shift+Z | Undo, Redo |
| Ctrl+S | Save draft |
| Ctrl+D | Duplicate the field |
| Delete | Remove the field |
| Alt+Up, Alt+Down | Move the field |
| Ctrl+C, Ctrl+V | Copy and paste fields, also between forms |
| / | Find a field to add |
| Escape | Back to the form settings |
| Up, Down | Choose the field above or below |
The other tabs#
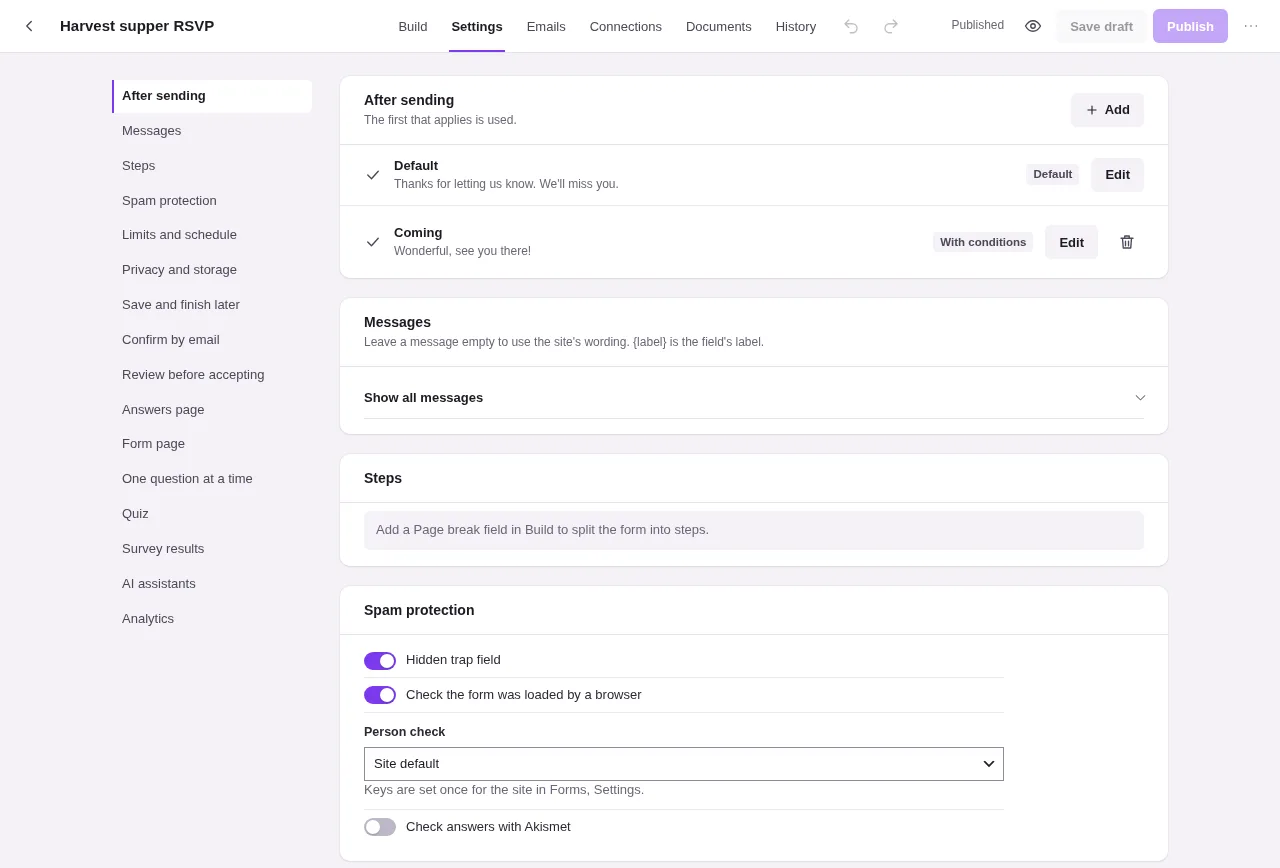
- Settings holds everything about the form as a whole, in sections: After sending, Messages, Steps, Spam protection, Limits and schedule, Privacy and storage, Save and finish later, Confirm by email, Review before accepting, Answers page, Form page, One question at a time, Quiz, Survey results, AI assistants and Analytics. See After sending, Limits, saving and spam and Quizzes, form pages and post forms.
- Emails holds the emails sent when answers arrive. See After sending.
- Connections sends answers to other services. See Connections.
- Documents makes PDF documents from answers. See PDF documents.
- History lists earlier versions of the form, newest first, each labeled with what changed ("Added Phone", "Changed 3 fields"). Saves by one person within ten minutes are kept as one version, and the last 20 versions are kept. Restore makes a version the draft; visitors keep the published form until you publish, and the current version stays in History.
Everything on these tabs is part of the same draft: Undo, autosave, Save draft and Publish cover them too.
Saving and publishing#
- The builder saves a draft by itself a few seconds after you stop changing things. The status beside Undo says Saving…, Unsaved changes, Not saved (the save failed), Draft saved or Published.
- Save draft (Ctrl+S) saves now. Visitors still get the published form.
- Publish puts the draft live. With unsaved changes, it saves and publishes in one step.
- More > Drop unpublished changes takes the form back to what visitors see now.
- Publishing a page also publishes its forms. When you publish a page in the page editor, the drafts of the forms that page shows are published too, for forms you may edit.
- If someone else saved the form after you opened it, the builder says Someone else saved this form and offers Keep mine or Load theirs.
- Leaving with unsaved changes asks first: Stay, Leave without saving or Save draft and leave.
Preview saves the draft and opens it on a page of its own in a new tab, for people who may edit the form. The page says whether it shows the draft ("Visitors see the published form until you publish"). Answers sent from a preview are kept like any others, so use test answers and delete those entries afterwards.
Put a form on a page#
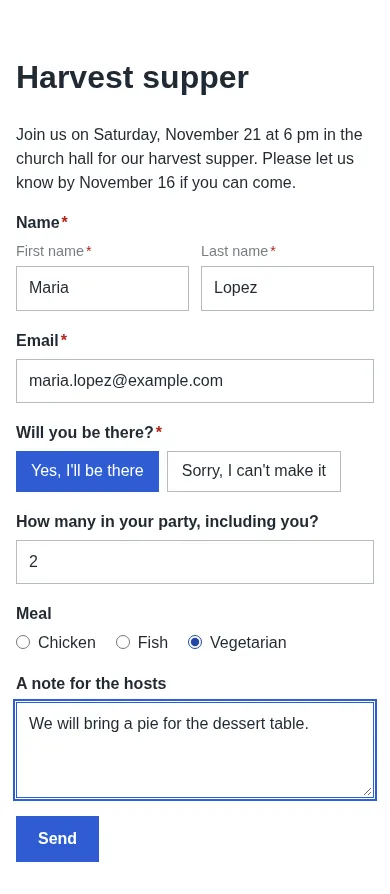
In the page editor
- Choose Add content, then Form (search for it, or find it under Live content). Or select something on the page, open its menu, choose Add here… and pick Form; type "form" in Developer mode's search to find it next to Simple form. On a site with no forms yet, Kindly makes a contact form named for the page and shows it at once.
- In the element's panel, pick the Form to show, or click New form beside it to make another contact form and show that instead. A toast offers Open it to change its questions.
- Choose Show the form's title (No or Yes) and the Look: Form setting, Classic, or One question at a time.
- Save and publish the page.
The form is drawn live in the editor, as visitors will see it. Its fields are not edited on the page: the panel's Edit this form button opens the form's builder in a new tab. Changes there reach visitors once the form is published, or when you publish the page.
With the shortcode
Anywhere WordPress runs shortcodes (the block editor, widgets, other plugins' content), use:
[kindly_form id="12"]
[kindly_form id="12" title="yes" style="conversational"]
id is the form's number (shown in the builder's address, #/forms/12). title="yes" shows the form's name above it. style is classic or conversational; left out, the form's own One question at a time setting decides.
On a page of its own
A form can also have its own address, such as /form/club-sign-up/, with no page needed. Turn it on in Settings > Form page. See Quizzes, form pages and post forms.
In a popup
Put the form on the popup's content like on any page. A form's After sending can also open a popup. See Build and manage popups.
What is where#
- Fields and layout: every field type and its settings, columns, steps, repeating groups, sections, one question at a time.
- Conditions and calculations: showing and hiding fields, calculated numbers.
- Smartcodes: every
{code}that puts answers and other values into words. - After sending: confirmations, emails, confirming by email, approval, the answers page.
- Limits, saving and spam: save and finish later, limits and schedules, spam protection.
- Entries and reports: reading, sorting and exporting answers.
- Connections: sending answers to other services, webhooks, logs and retries.
- Payments: products, totals, coupons, subscriptions and payment services.
- Stock: limiting how many of each choice can be taken.
- PDF documents: documents made from answers.
- File storage: keeping uploads in cloud storage.
- Multilingual forms: forms in more than one language.
- Quizzes, form pages and post forms: quizzes, surveys, form pages, making posts and accounts.
- Import forms and templates: templates and bringing forms from Fluent Forms and Gravity Forms.
- Move an old page form to Kindly Forms: converting a page's built-in Form.
- AI and Kindly Forms: AI tools for forms and assistants that fill forms for visitors.
- Site settings: settings for every form on the site.
- Developer reference: REST routes, hooks, field types and connection providers.